
SpringBoot编写WebService服务端示例
温馨提示:
本文最后更新于 2022年09月27日,已超过 575 天没有更新。若文章内的图片失效(无法正常加载),请留言反馈或直接联系我。
1.创建SpringBoot Maven项目,JDK1.8
创建地址:https://start.spring.io/
依赖先不用选,直接先创建好项目。
2.导入Eclipse,pom文件引入所需依赖
<dependency>
	<groupId>org.springframework.boot</groupId>
    <artifactId>spring-boot-starter-web-services</artifactId>
</dependency>
<dependency>
        <groupId>org.apache.cxf</groupId>
        <artifactId>cxf-rt-frontend-jaxws</artifactId>
        <version>3.1.6</version>
</dependency>
<dependency>
       <groupId>org.apache.cxf</groupId>
        <artifactId>cxf-rt-transports-http</artifactId>
       <version>3.1.6</version>
</dependency>
3.编写WebService接口与实现类
无参接口
package cn.richwit.webservice.test;

import javax.jws.WebMethod;
import javax.jws.WebParam;
import javax.jws.WebService;

/**
* @author 王小东
* @date 2022年9月26日  下午4:15:00
* @version 1.0
*/
@WebService(name = "TagerService", // 暴露服务名称
	targetNamespace = "http://test.webservice.richwit.cn"// 命名空间,一般是接口的包名倒序
)
public interface TagerService {
	@WebMethod
    public String message(@WebParam(name = "message") String message);
}
无参实现
package cn.richwit.webservice.test;

import java.util.HashMap;
import java.util.Map;

import javax.jws.WebService;

import org.springframework.stereotype.Component;

/**
* @author 王小东
* @date 2022年9月26日  下午4:18:18
* @version 1.0
*/
@WebService(serviceName = "TagerService", // 与接口中指定的name一致
	targetNamespace = "http://test.webservice.richwit.cn", // 与接口中的命名空间一致,一般是接口的包名倒
	endpointInterface = "cn.richwit.webservice.test.TagerService"// 接口地址
)
@Component
public class TagerServiceImpl implements TagerService {
	@Override
	public String message(String name) {
		Map<String,Object> map = new HashMap<>();
		map.put("name", "华南虎");
		map.put("age", 20);
		map.put("type", "猫科豹属下的老虎亚种");
		map.put("content", "华南虎头圆,耳短,四肢粗大有力,尾较长,胸腹部杂有较多的乳白色,全身橙黄色并布满黑色横纹。毛皮上有既短又窄的条纹,条纹的间距较孟加拉虎、西伯利亚虎的大,体侧还常出现菱形纹,在亚种老虎中体型较小。华南虎以草食性动物野猪、鹿、狍等为食,是中国的十大濒危动物之一、国家一级保护动物,红色物种名录极度濒危。");
		return map.toString();
	}
}
有参接口
package cn.richwit.webservice.test;

import javax.jws.WebMethod;
import javax.jws.WebParam;
import javax.jws.WebService;

/**
* @author 王小东
* @date 2022年9月26日  下午4:13:31
* @version 1.0
*/
@WebService(name = "TestService", // 暴露服务名称
	targetNamespace = "http://test.webservice.richwit.cn"// 命名空间,一般是接口的包名倒序
)
public interface TestService {
	@WebMethod
    public String sendMessage(@WebParam(name = "username") String username);
}
有参实现
package cn.richwit.webservice.test;

import javax.jws.WebService;

import org.springframework.stereotype.Component;

/**
* @author 王小东
* @date 2022年9月26日  下午4:16:35
* @version 1.0
*/
@WebService(serviceName = "TestService", // 与接口中指定的name一致
	targetNamespace = "http://test.webservice.richwit.cn", // 与接口中的命名空间一致,一般是接口的包名倒
	endpointInterface = "cn.richwit.webservice.test.TestService"// 接口地址
)
@Component
public class TestServiceImpl implements TestService {

	@Override
	public String sendMessage(String username) {
		return "群众1:听说有一个大帅哥 ' " + username + "'发教程了,你点赞收藏学习了吗?群众2:必须得~ 这TND还真是个人才!";
	}
}
4.编写配置文件 @Configuration ,暴露WebService接口
package cn.richwit.webservice.config;
import cn.richwit.webservice.test.TagerServiceImpl;
import cn.richwit.webservice.test.TestServiceImpl;
import org.apache.cxf.Bus;
import org.apache.cxf.bus.spring.SpringBus;
import org.apache.cxf.jaxws.EndpointImpl;
import org.apache.cxf.transport.servlet.CXFServlet;
import org.springframework.boot.web.servlet.ServletRegistrationBean;
import org.springframework.context.annotation.Bean;
import org.springframework.context.annotation.Configuration;
import javax.xml.ws.Endpoint;
@Configuration
public class CxfConfig {
@SuppressWarnings({ "rawtypes", "unchecked" })
@Bean
public ServletRegistrationBean disServlet() {
ServletRegistrationBean servletRegistrationBean = new ServletRegistrationBean(new CXFServlet(), "/webService/*");
return servletRegistrationBean;
}
@Bean(name = Bus.DEFAULT_BUS_ID)
public SpringBus springBus() {
return new SpringBus();
}
@Bean
public Endpoint endpoint() {
EndpointImpl endpoint = new EndpointImpl(springBus(), new TestServiceImpl());
endpoint.publish("/TestService");
return endpoint;
}
@Bean
public Endpoint endpoint2() {
EndpointImpl endpoint = new EndpointImpl(springBus(), new TagerServiceImpl());
endpoint.publish("/TagerService");
return endpoint;
}
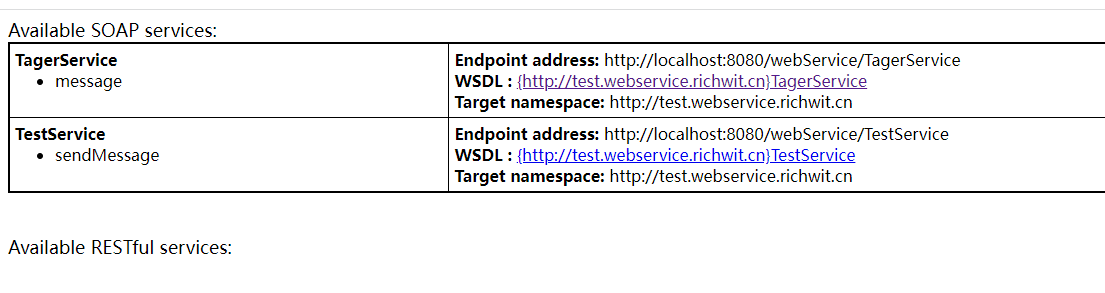
} 5.启动项目测试
直接访问:http://localhost:8080/webService
可以看到已经暴露的两个接口地址,点进去就是对应的XML
正文到此结束
- 本文标签: 后端 WebService Java
- 本文链接: http://www.92cxy.cn/article/43
- 版权声明: 本文由王小东原创发布,转载请遵循《署名-非商业性使用-相同方式共享 4.0 国际 (CC BY-NC-SA 4.0)》许可协议授权
热门推荐


相关文章
该篇文章的评论功能已被站长关闭
